I think that all of us can recall the feeling three months into our first Software Engineering job, coming up with a solution that includes every advanced language feature we could possibly think of. That desire doesn’t come from a bad place – maybe we think it’s the most generalizable, abstract solution to potentially changing requirements. Maybe a small part of it is just compensating as we struggle to acclimate to the idea of being the most ignorant person in the room.
# This is brilliant…
class LoggerMeta(type):
    def __new__(cls, name, bases, dct):
        for attr, val in dct.items():
            if callable(val):
                dct[attr] = cls.log_decorator(val)
        return super().__new__(cls, name, bases, dct)

    @staticmethod
    def log_decorator(func):
        def wrapper(*args, **kwargs):
            print(
                f"Calling {func.__name__} with {args} "
                f"and {kwargs}")
            return func(*args, **kwargs)
        return wrapper

class Calculator(metaclass=LoggerMeta):
    def add(self, x, y):
        return x + y

# But I like this
def add(x, y):
    print(f"Calling add with {x} and {y}")
    return x + y
Despair
This goes on until you’re on the other side of that mess, until you maintain a product and see the evils of complexity – bugs, operational cost, difficult troubleshooting. I assure you, when you’ve just been paged in the middle of the night, sniffling with used tissue paper littering your desk, having not slept well the night before because you’d just had a fight with your partner, and the first clue leads you to code that’s abstracted seven levels of hell deep, you will regret the pristine, polymorphic, meta-decorated masterpiece you wrote three years ago.
Anger
Then, one day, you’re in a planning meeting with your Engineering and Product Managers, discussing the prioritization of the last item above the line – and are disappointed when the decision is made to prioritize a customer-facing feature over that juicy chunk of tech debt you’ve been championing to pay off for four quarters now. At this point it’s not tech debt, it’s a campfire story the team nervously laughs at. That’s when the realization hits – simplification never happens. It’s hard to justify a time investment that doesn’t drive revenue. Code will only ever get more complex. I know that for me, it’s harder to review code than it is to write it. If I write the most sophisticated code I can muster, then by definition I won’t be clever enough to understand it years into the future.
Acceptance
The most pragmatic thing we can do is to slow down the rate of ever-increasing complexity. Championing simplicity, even if it makes us look like a troglodyte, because simplicity is the ultimate sophistication. It requires making our own mistakes to get there. Change the code when requirements change, but not before. Simplicity is when the design does not surprise new team members. Perfection is not when you’ve added all that you could; it’s when there’s nothing left to remove. Come up with a design that others won’t even notice is there. Code like you drive: try to be the least surprising driver on the road. Consider finding creative outlets that don’t involve architecture diagrams. Boring is good. Keep your curiosity, keep your creativity, but consider channeling it toward problem solving rather than the minutia of design.
Wisdom
Finding the balance. Harmony comes when you develop the judgment to know when to design for resilience. There are, in fact, times when adaptability and associated complexity is Good (™). Understand when certainty is low, and no amount of data gathering will raise it. Knowing that requirements might change with a probability that’s just high enough to warrant sophisticated design. It’s rare, but it happens.
We all cope with COVID differently – my coping mechanism of choice is to obsess, research, and then buy things – my mind recently decided to zoom in on re-doing my videoconferencing setup. I learned a lot during said obsession period, and since I work for Red Hat, I’ve been indoctrinated to share what I learn, so here we are.
Why Bother?
Recent research shows confirms my intuition – people are attracted to good audio – they’ll want to have longer conversations with you. Conversely, we subconsciously try and cut conversations short if we can’t properly understand what the other side is saying, and we certainly can’t hope to replace the value we get from lengthy in-person collaborative work sessions with poor audio or video.
End Result
Please excuse the wanting amount of headphones, this picture was taken after selling off 6 pairs
Starting Position
The initial challenge was moving my workstation from a sizable room with plenty of natural light to a nook that’s a good 20 meters from a window. My USB webcam (a Logitech StreamCam) just couldn’t deal with the darkness – the video was grainy and choppy. The nook has 2 spotlights directly overhead that do a fantastic job of highlighting my receding hairline.
Solving the lightning situation quickly devolved to a “money is but for an arbitrary concept!” type deal and so I ended up buying (and this is also in recommended priority order!)
Deity video mic
Philips Hue lights
Canon m200 camera and an HDMI capture card
Airpods
The rest of the post will explain those choices as well as alternatives in each category. There’s a summary at the end if you don’t like reading (no judgement! well… a little bit of judgement).
USB Microphones
Good audio is the most important factor of a pleasurable video call. Bad video is fixable – just turn it off. Bad audio is cause for ending the call early. We all have better things to do than try to decipher the echoy audio coming off your webcam or laptop, so quit that shit and buy a $50 USB mic. My research strategy of late is to buy 5-6 popular options, evaluate them, and return what didn’t survive what can only be described as a sad battle royale.
Of the options above I recommend the Razer Seiren Mini. The audio quality was comparable to the offerings from Yeti that’s 4 times as expensive. The Razer is cheaper, smaller, comes in a selection of colors, and is available through all major retailers. Remember that video call apps compress audio to hell and back — if you’re looking into content creation on YouTube and such, a higher end mic may well be worth it, but for video calls, the Seiren is the best $50 you can spend.
But, strange internet person, you may be asking, why is the Seiren not in that the picture of the nook of sadness you shared above?
Generally speaking, mics sound best when they’re a fist away from your mouth. Even the Seiren makes you sound like you’re on a podcast if you hold it close to your mouth — by putting it on the desk stand, you lose the bassy, velvety goodness that your voice naturally exudes. The solution is to put it on a desk clamping boom arm, but that means that you’ll end up looking like this guy:
A very handsome man to be sure, but we’re not creating a podcast, we’re just trying to complain about COVID on a call or ignore whatever the person ahead of us on the standup is saying, so assuming you don’t want your microphone in shot, you have to either settle on mediocrity like some oddly apt symbolization of my philosophy on life, or buy a shotgun mic.
Shotgun Microphones
Shotgun mics, otherwise known as video mics, are typically mounted to the top of a video camera and are used in outdoors situation where the audio source is a few meters away from the mic. As you can understand they’re intended for longer range audio pickup – perfect! I put a Deity V-Mic D3 Pro on a desktop stand, hooked it up to my laptop’s aux output, a USB C cable to a power outlet, and viola! Marginally better audio for five times the cost!
Headsets
Alternatively, you can use a headset such as the Jabra Evolve 65 – super comfortable and lightweight, wireless via a USB dongle (so you avoid Linux Bluetooth oddities), and charges via the included stand, so you don’t have to remember to plug it in. The microphone audio quality is very clear, it’s just a thin sound that you don’t get via either the USB mic or shotgun mics I recommended. Also, nobody can pull off a headset.
PulseEffects
So you got a USB or shotgun mic, plugged it in, and you’re still getting an echoy sound, or picking up noise from a nearby computer fan. What gives? Enter PulseEffects. Setup echo and noise cancellation, close the app, and forget about it.
Audio
So you got the mic working, great! I understand that some people are interested in what the other people on the call are saying or whatever, so you’ll be forced to find some sort of audio solution. I ended up going with Airpods because they:
Are unobtrusive and less distracting to the other party – I figured in-ears would work better than over-ears in this regard
They charge wirelessly, so you can just plop them on a puck in-between calls — you don’t have to remember to charge them, they just… do
They’re ridiculously comfortable – they are not in-ears, in the sense that they don’t plug your ear canal – they have a fit more like earbuds, so you can hear the sound of your own spectacular voice, which is the interesting portion of most calls anyway, and your surroundings – for example, the sound of your wife yelling from the other room “I’M POOPING IF THE BABY DIES IT’S YOUR FAULT” which is totally not something that actually happened
They’re useful outside of work too, for example when walking said baby that totally didn’t die that one time
For Android users I can recommend the Galaxy Buds Live, the only other True Wiresless but-not-in-ear in existence
Lights
Aww, common, internet stranger, when do we get to the fun part? (That’d be the camera, dumdum). Well, soon, but first we have to talk about something that actually matters as far as video calls – lighting. You could use a $50,000 professional film camera but if your background is overexposed because the camera is facing a window, or if your face is just not lit enough, you will look like ***Insert an admittedly slightly funny but otherwise super distracting joke. Seriously, Assaf, don’t forget to put the joke here!***
Most commonly, people stick a ring light on a desk clamp stick, or 2 x key lights, one slightly to the left of your face, and other slightly to the right, either mounted to your monitor, or to the desk. Elgato makes products well suited for streamers and content creators, certainly for video calls.
Ring and key lights can be used with a stand or a mount. I strongly recommend lighting that can adjust intensity and color.
Indirect Lighting
If your eyes are bothered by direct lighting, for example, if you’ve spent years working as an instructor staring down a projector, causing permanent eye damage (a totally made up scenario that has no basis in reality), ask your doctor if indirect lighting is for you.
Assuming your workstation is facing a wall, the goal is to throw light against the wall and let it bounce back against your face. The result is a pleasant and diffused light that is very flattering on camera and doesn’t bother your eyes. I ended up in the Philips Hue ecosystem. I bought:
Hue Bridge – Hue devices speak Zigby to the bridge, which is then connected via a wired connection to your router. In our case we use a modem and an Eero router in our living room, that has a backchannel to a 2nd Eero router near my workstation, that is then connected via a physical wire to the Hue bridge
Hue Dimmer switch – Hue lights can be controlled via the app or Alexa and her friends, but ultimately I’d rather just push a button. Both color temperature and light intensity are easily controlled via the remote. The dimmer switch controls all 4 lights simultaneously.
3 x Play Light Bars (technically a 2 pack, and an additional single pack) – 2 x are glued to the back of the monitor, and one on a shelf facing up
Signe table light – I still wasn’t getting enough light, so I got this table lamp facing the corner
Video
There’s a few problems with built-in laptop webcams:
The video quality is, to use a scientific term, poopy
The angle is way too low – we don’t need to see your noise hair. Literally nobody looks good from a down-angle. Ideally the lens would be level with your eyes, or from a slight up-angle
The easiest and most cost effective solution is a USB camera. I recommend these:
Razer Kiyo Pro ($200, noticeable improvement in video quality)
A comparison of the Razer Kiyo vs. different laptop webcams. Notice how blurry the Dell webcam looks
Mirrorless and DSLR Cameras
But what if you want to look really, really, really ridiculously good looking? Well then, that’s where mirrorless and DSLR cameras come into play! You’re looking for an entry level one (they start at $500) that has “clean HDMI output”, that is, one that does not overlay grey rectangles and other oddities on HDMI output, and one that doesn’t have an auto turn off (for thermal reasons), and finally you’re going to need quick and silent auto focus. Again we can look to the streaming world to guide us, here are the recommended models:
Both will do great, and the stock adjustable lenses are superb for video calls – they let you adjust the field of view, depending on your distance from the camera and your desired shot width.
USB vs. HDMI
How do you get the video feed to show up in video conferencing software? Typically via either USB or HDMI. Canon offers the free EOS Webcam Utility, that conveniently only works on Windows and Mac. There are solutions to capture USB video output on Linux, and I was able to get it to work but could never get a decent frame rate. I finally broke down and bought an Elgato Camlink – a plug and play “HDMI capture card”, or to put it another way, a converter from the camera’s HDMI output to USB. This works flawlessly on Linux, I encountered no issues whatsoever; both the video quality and frame rate were sublime.
Power
The Canon m200, Sony a5100, and similar models are intended to be used out and about. They come with a battery but surprisingly, they don’t come with anything that allows them to be charged as you’re using them. An even bigger surprise is that their USB interfaces don’t charge them either. The solution are affectionately nicknamed dummy battery packs – a device that plugs into the camera’s battery on one end and to AC power on the other end. I bought an off brand one for my Canon m200 – there are those that suggest to only buy the (3-4x more expensive) name brand, but uhh… YOLO. Also note that you need to be careful and to buy a dummy pack that is compatible with your particular model – they do not use a universal sized battery.
To this day I see confusion surrounding the terms: Tenant, provider and external networks. No doubt countless words have been spent trying to tease apart these concepts, so I thought that it’d be a good use of my time to write 470 more.
At a Glance
Creator
Model
Segmentation
External router interfaces
Tenant
User
Self service
Selected by Neutron
Provider
Administrator
Pre created & shared
Selected by the creator
External
Administrator
Pre created & shared
Selected by the creator
Yes
A Closer Look
Tenant networks are created by users, and Neutron is configured to automatically select a network segmentation type like VXLAN or VLAN. The user cannot select the segmentation type.
Provider networks are created by administrators, that can set one or more of the following attributes:
Segmentation type (flat, VLAN, Geneve, VXLAN, GRE)
Segmentation ID (VLAN ID, tunnel ID)
Physical network tag
Any attributes not specified will be filled in by Neutron.
OpenStack Neutron supports self service networking – the notion that a user in a project can articulate their own networking topology, completely isolated from other projects in the same cloud, via the support of overlapping IPs and other technologies. A user can create their own network and subnets without the need to open a support ticket or the involvement of an administrator. The user creates a Neutron router, connects it to the internal and external networks (defined below) and off they go. Using the built-in ML2/OVS solution, this implies using the L3 agent, tunnel networks, floating IPs and liberal use of NAT techniques.
Provider networks (read: pre-created networks) is an entirely different networking architecture for your cloud. You’d forgo the L3 agent, tunneling, floating IPs and NAT. Instead, the administrator creates one or more provider networks, typically using VLANs, shares them with users of the cloud, and disables the ability of users to create networks, routers and floating IPs. When a new user signs up for the cloud, the pre-created networks are already there for them to use. In this model, the provider networks are typically routable – They are advertised to the public internet via physical routers via BGP. Therefor, provider networks are often said to be mapped to pre-existing data center networks, both in terms of VLAN IDs and subnet properties.
External networks are a subset of provider networks with an extra flag enabled (aptly named ‘external’). The ‘external’ attribute of a network signals that virtual routers can connect their external facing interface to the network. When you use the UI to give your router external connectivity, only external networks will show up on the list.
To summarize, I think that the confusion is due to a naming issue. Had the network types been called: self-service networks, data center networks and external networks, this blog post would not have been necessary and the world would have been even more exquisite.
Leadership to me seems largely revolving around the topic of persuasion.
How do you get people to do something important but not exciting? (e.g. documenting a feature). How do you reposition the unattractive activity in to a norm, and make people want to do it?
How do you nudge people’s mentality or attitude? Spotting an overarching problem with an employee (e.g. snubs his/her nose at writing end to end tests), how do you get them to come around and eventually even lobby others?
How do you communicate a significant decision? (e.g. going with one technology over the other). You won’t be able to please everyone, but you can minimize pushback and resentment with some.
How do you handle yourself when the person you are talking with has a polar opposite interest to you, and a decision has to be made nevertheless? (e.g. you’re trying to decide which team will on board a new hire).
All people naturally fall somewhere on the scale. Even looking at an individual, you may come down harder on one side at any given day depending on how well you slept, if you have indigestion, or if you just happen to feel impatient. People respond to these persuasion styles differently, and like with anything I’ve found that people gravitate towards others like them, and this is when adjusting to your audience comes in to play. Culture also factors in to this. Coming in to an international organization, ignoring outliers, the difference between, say, an Israeli and an English employee is almost comically apparent.
Defining the aggressive and measured persuasion styles
To elaborate on the aggressive and measured approaches, let’s use an example of a manager involved in a technical decision. The manager in this scenario is exposed to information earlier than his team members, and a decision has to be made regarding the high level architecture of a future project: Which technology stack should be used: Tried and true A or new and exciting B? To drive home the point, in this scenario the manager develops a strong opinion favoring A, based on thorough exploration, past experience and strong expertise in the problem domain. Now the question is – How do you as a manager gain deep acceptance of A and minimize pushback within the team?
The aggressive approach would be to expose the manager’s opinion early in the process, fully embracing an inherent managerial influence, and highlighting the benefits of option A. An even more aggressive approach would be to avoid presenting B as an option in the first place, or not framing the conversation as a discussion but as an announcement.
The measured approach, even in the case of the manager’s strong preference for option A, is to allow a full and honest discussion to take place. The manager would present their opinion late in the process or perhaps never at all. The manager would either stay out of the discussion entirely, or help facilitate an investigation led by the team itself, looking in to the benefits and drawbacks of options A and B. The manager would be presenting both options in a completely neutral way, as if the manager holds no opinion on the matter. The manager does not present A and B, rather the options present themselves by an external quasi-Buddhist selfless conscious creature. The advantage of course is that a decision that comes from within the team has a much stronger stickiness. From the perspective of the manager, a possible risk is that the team can land on B. At that point the manager has to choose their next move, especially in the case that the manager is convinced that choosing B will cause real and irreversible harm to the organization.
Different but equal?
This is when I tell you that while both approaches are different, one is not better than the other. Well, no. What wasn’t obvious to me is that it is not merely a matter of style. The measured approach is in fact common to all senior and effective members of my organization and is therefore implicitly encouraged, to the extent that this topic becomes relevant when it is time to talk about bonuses and promotions. While the lack of tolerance for a different tendency was surprising to me, it is easy to understand why in an Engineering organization, a measured approach would be beneficial. To explain why I think that an organization rewarding measured persuasion might not be fully optimized, I claim that it is reasonable to draw a line from persuasion style to a wider discussion about personality traits. For example, the ability to regulate emotions like passion or agitation, or even something like a person’s tolerance to disagree in public forums.
Point being, if you tell me that a person has an extremely measured persuasion style, I will be able to tell you with reasonable certainty about other character traits that that person may possess.
A natural tendency to avoid stating their opinion on controversial issues
Shying away from being the sole and visible decision maker (and in extreme cases: cover your tush syndrome)
Not being willing to cut a discussion short when it becomes clear that further debate will not change anything
When an unscientific method is preferred in an Engineering organization
My claim is that at times, an aggressive decision maker is what you’re after. Sometimes timing is what will make a difference to your success and you cannot afford the unfortunate cost of inclusivity or the uncertainty the decision making process introduces to your organization. A team or organization filled with hot shots will be too quick to make mistakes or too slow to identify one. An organization filled with academic style deliberates will be too busy to ensure that the problem was looked at from all angles to notice that a more nimble competitor has already gained market share. An organization that explicitly favors this type of mentality may implicitly create a homogeneous echo chamber and conflate an attitude that uses disagreement as a tool to find truth [1] with those that are just unwittingly difficult. Sometimes it is unfair to decide by committee, or to involve people impacted by the decision, and to be unwilling to make a hard decision yourself. Sometimes we are too quick to consciously decide not to make a decision and let the scenario play itself out, rationalizing for inclusivity and transparency, thereby ignoring the human cost to the people involved by a persistent uncertainty. I would go further and say that the line between an overly measured demeanor and cowardice is thin.
I’d try and reframe this discussion from one where one approach is clearly superior to the other, to a discussion about diversity of thought. While as a rule of thumb I prefer measured persuasion, I’ve found that both approaches have their merits, and that a team flourishes with a healthy mixture of attitudes. I would encourage people in a position of influence to try and create an atmosphere where both approaches are ultimately tolerated, and in hiring stages I would be wary of biases that lead us to recruit people just like us.
Adding new configuration options has a cost, and makes already complex projects (Hi Neutron!) even more so. Double so when we speak of architecture choices, it means that we have to test and document all permutations. Of course, we don’t always do that, nor do we test all interactions between deployment options and other advanced features, leaving users with fun surprises. With some projects seeing an increased rotation of contributors, we’re seeing wastelands of unmaintained code behind left behind, increasing the importance of being strategic about introducing new complexity.
I categorize the introduction of new OpenStack configuration options to two:
There’s two or more classes of operators that have legitimate use cases and a configuration option would enable those use cases without hurting cloud interoperability
For example: Neutron DVR, is essentially a driver for router implementations, that changes your L3 architecture substantially while abstracting details via an API. DVR has various costs and benefits and letting operators make that choice, especially as the feature matures, makes sense to me.
Developers that don’t fully understand the choice they are making and pass the complexity down to the operators to figure out. This results in options that are often never changed from their defaults because operators don’t have access to sufficient documentation that explains the rationale for choosing a specific value, as well as a misuse of time and energy because developers sometimes focus on use cases that are off center or don’t exist.
For example: neutron.conf:DEFAULT:send_events_interval: Number of seconds between sending events to nova if there are any events to send. Unless you grep through the code, how is an operator supposed to know if they should increase or decrease the value? Even then, shouldn’t developers take responsibility of that choice, and test for the best value? If problems are found under load, shouldn’t the value be calculated as a function of some variable? Instead of distributing the work to thousands of operators, wouldn’t we as a community like to to do the work in one place?
When contemplating adding a new option, ask yourself:
Is it possible that you don’t fully understand the use case, and in lieu of making a choice, you’re letting the operator bear the burden?
Are you, and your replacement, prepared to own the cost of the new option indefinitely?
In continuation to a previous blog post https://assafmuller.com/2016/12/02/upstream-contribution-give-up-or-double-down/, I presented a version with new content at the recent OpenStack Boston summit. The session had a fair amount of participation and discussions, where we talked about the journey of a new contributor in OpenStack through the lens of data gathered from Gerrit and Stackalytics. We even had members of the Technical Committee that were interested in concrete action items they could take on their part – How do we make it easier for new contributors? What behaviors work in the quest to get your patches merged quicker?
The video, slides and code used to generate the data are below:
Every once in a while I have to recognize the beauty that is a high level language.
Consider this code snippet:
def square(x):
 return x**2

l = [1, 2, 3, 4]
for x in map(square, l):
 print(x)
And this one:
from multiprocessing import Pool

def square(x):
 return x**2

l = [1, 2, 3, 4]
for x in Pool().map(square, l):
 print(x)
Discounting the import line (Because I’m trying to make a point here, dammit!), the diff is a total of 7 characters. Of course, if you recall your Computer Science operating systems 101, the complexity that is hidden here is breath taking. And yet, Python multiprocessing exposes an API that is identical to Python’s good old ‘map’. It does so and manages to keep it boring, without exposing the caller to messy internals and endless complications that are usually involved whenever we dive in to the world of multi processing.
Even more impressive is the fact that I exploited this abstraction in a real world app that does honest to Zeus useful things, and it “just worked”. The processing time was cut by half and I didn’t need to worry about forking, sockets, PIDs, creating and managing processes or any of that mess. All I had to do was focus on the subject matter and not the underlying code. That is the beauty of a high level language. You don’t have to use up cognitive load thinking about memory management, the syntax of templates meta programming, or the depth of pointer dereferencing required, instead you can focus on getting something useful done.
* Herein lies a vim vs. Emacs type disclaimer: Every tool has its place. I would never dream of using Python for a demanding mobile game (Or a cloud operating system, for that matter), but wow is Python fun when you’re parsing and processing tens of thousands of JSON files.
One of my personal highlights of the recent Barcelona Summit was a session by Mirantis engineers Elena and Oleg titled “Is OpenStack Neutron Production Ready for Large Scale Deployments?”. In the session they outline a comprehensive control and data plane testing effort, run on two labs, one with 200 nodes and run of the mill hardware, and the other with 378 and top of the line hardware, all running the Mirantis distribution based off Mitaka with standard ML2/OVS, DVR, L2POP and VXLAN. In the session they show near line-rate speed for east/west and north/south routing with jumbo frames and VXLAN offload enabled. They were also able to spawn 24,500 VMs across 125 networks without errors and low CPU consumption.
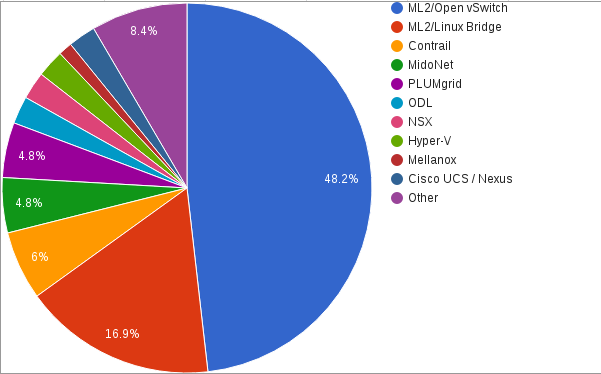
Turning our eyes to adoption, the OpenStack Foundation conducts a usage survey every 6 months. Looking at the April 2016 user survey, we can see that ML2 with Open vSwitch and Linux Bridge dwarf other solutions.
Examining the openstack/neutron project via Stackalytics we see that ML2/OVS has a rich and robust community with 20 companies contributing over 5 patches in the Newton time frame. 779 people have contributed at least 1 patch to Neutron since its inception, 215 of which during the Newton timeframe. Some of the effort targeted the base Neutron platform, e.g. configuration options, database work, versioned objects, quotas or other in-tree ML2 drivers such as SRIOV. Looking at the contribution of everyone who has committed at least 5 patches in the Newton cycle, we are left with 50 authors, 42 of which contributed at least 1 patch to ML2/OVS.
Looking at the interactive version of the OpenStack user survey we can see that ML2/OVS is the most popular choice by an order of magnitude regardless of deployment size. And so to answer the question: “Is OpenStack Neutron ML2/OVS Production Ready for Large Scale Deployments?”. Yes, it is, of course it is. It has been for some time now.
Ever since I’ve been involved with OpenStack people have been complaining that upstream is hard. The number one complaint is that it takes forever to get your patches merged. I thought I’d take a look at some data and attempt to visualize it. I wrote some code that accepts an OpenStack project and a list of contributors and spits out a bunch of graphs. For example:
How long does it take to merge patches in a given project over time? Looking back, did governance changes affect anything?
Is there a correlation between the size of a patch and the length of time it takes to merge it? (Spoiler: The answer is… Kind of)
Looking at an author: Does the time to merge patches trend down over time?
Looking at the average length of time it takes to merge patches per author, how does it look like when we graph it as a function of the author’s number of patches? Reviews? Emails? Bug reports? Blueprints implemented?
The data suggestes answers for many of those questions and more.
Here’s a few resources about effective upstream contribution. It’s all content written by and for the Neutron community but it’s applicable to any OpenStack project.
I’ve observed a persistent theme across valuable and successful CI systems, and that is actionable results.
A CI system for a project as complicated as OpenStack requires a staggering amount of energy to maintain and improve. Often times the responsible parties are focused on keeping it green and are buried under a mountain of continuous failures, legit or otherwise. So much so that they don’t have time to focus on the following questions:
How do you determine that a job failed?
How are the results presented to the relevant developers?
Can developers do anything about a failure?
To bring it to concrete terms let’s take a look at how Rally is used in upstream jobs. This is not a criticism of the Rally project itself, which I’m a big fan of, but rather how it’s used upstream. It uses the standard upstream CI infrastructure, which is a miracle of engineering when it comes to correctness tests. The infrastructure spins up VMs from a node pool comprised of many clouds. It then uses devstack-gate and devstack to install OpenStack and runs several Rally scenarios. When the result of a CI run is True or False, the variance of hardware and congestion levels is irrelevant. However, when you’re trying to measure performance, variance matters. You can try setting a maximum, and any result over the maximum is declared as a failure, however with a variance sufficiently large setting up SLAs is an exercise in futility.
Let’s look at a recent Linux Bridge change [1] that cannot impact Rally results (The Rally job is setup to run against Open vSwitch). Consecutive runs would ideally show the same results. However, looking at the results of patchsets 10, 11, 13 and 14, we can see that the total length of the job runs between 60 and 83 minutes. The full duration of the create_and_list_ports flow runs from 1517 seconds to 1887 seconds. The average for a single create_and_list_ports execution runs between 4.58s and 5.29s. What am I supposed to do with the results of the next run? What can I learn from it? I’d argue: Nothing. The results of the job are not actionable. The result is that the job has been non-voting ever since its introduction and worse yet, none of the engineers I work with look at its results.
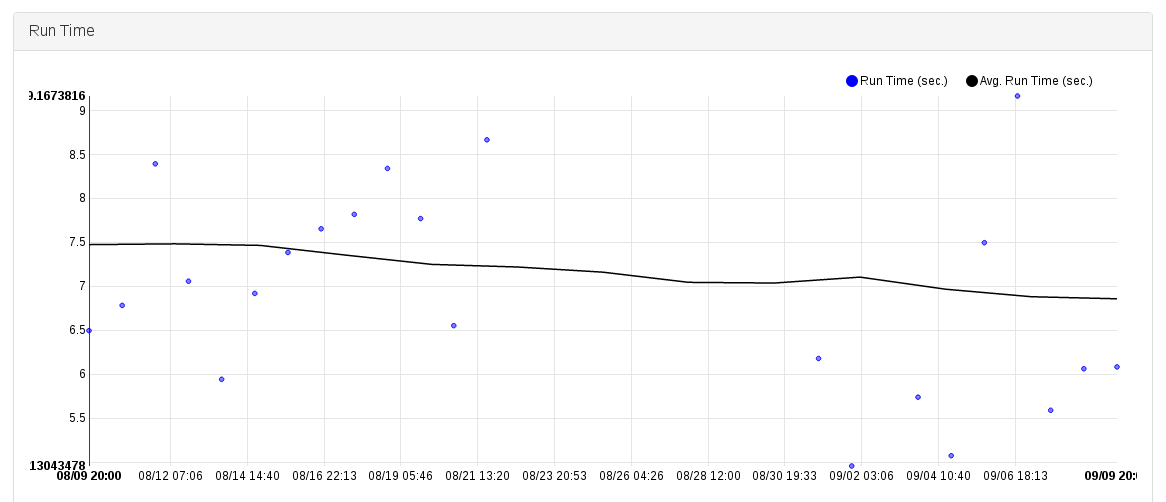
The next step would be to give up on the idea of gating or blocking performance regressions and instead detect them after the fact. We can do that by persisting historical results, graphing them and spotting trends. It’s clear that with a variance this large, the results would not be actionable either. To demonstrate this, let’s turn to the fantastic openstack-health project. Looking at the Neutron API test with the longest average run time [2] we can see that at the time of writing, the test ran 249 times in the past month so we get a great sample size. However, the run time graph looks like a Jackson Pollock painting, with a min of just under 5s and a max of just over 9s. Looking at the graph it’s clear we can’t clean up the data via statistical Jiu Jitsu either. When consistency matters, I don’t think you can get around a dedicated bare metal setup.
The Gerrit interface does a great job of presenting CI results, and a failing voting job forces developers to look at its results. However, I don’t know many engineers who look at CI results as a form of amusement. Post-merge and periodic CI runs in to these issues – They burn your favorite form of fossil fuels and drain the life force of the fine folks who maintain it but the results are often not presented in a consumable manner. Running the tests reliably is as important as making sure the intended audience is aware of the results. One solution could be to make sure the relevant developers subscribe to a mailing list, triggering a mail on failures filtered after distracting infrastructure issues. Periodic CI can only be valuable if it’s actionable and developers are held accountable and demonstrate a persistent urgency to failures.